Edit Pick or Name Lists in Case View
A field may include a list of values from which you pick a needed value. A pick list is unique to the field. A name list is one list that is used for all fields sharing common values (such as email To, From, CC/BCC, and Reply To fields).
If a field is a MULTI_VALUE type, you can select multiple values. you can edit a pick list or name list.
- Edit Single Value Lists
- Select a Single Value for a Multi-Value Pick/Name List
- Select Multiple Values for a Multi-Value Pick/Name List
Use the following procedures to work with pick or name lists in the case table.

|
TIPS: In the following steps, instead of double-clicking a field, you can click the field and press the F2 key or right-click and select Toggle Edit Mode. Also, this procedure assumes you are not already in Edit mode. If you are already in Edit mode, access a field by tabbing to it in the row you are editing or using other keyboard shortcuts. |
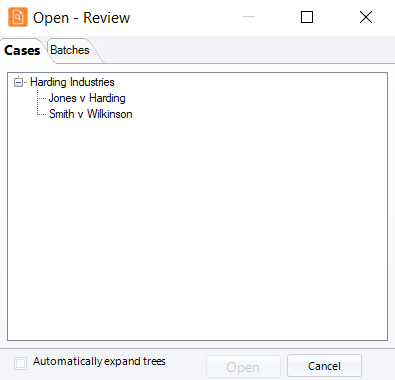
Open the Review Module
To Begin:
-
On the Dashboard, click the Review module.

-
Select a Client and Case and click Open.

Edit Single Value Lists
To edit a SINGLE_VALUE field that has been defined as a pick or name list:
-
Double-click the field to be edited.
-
Click
 corresponding to the field, then scroll in the list and click the
needed value.
corresponding to the field, then scroll in the list and click the
needed value. -
If the needed value does not exist and you have the needed privilege, double-click in the field, enter the new value, and press Enter.
-
Click Yes in response to the confirmation message. The new value will be selected and the next field will be selected for editing.
-
Continue editing or use keyboard shortcuts to navigate in the table or stop editing.
|
|
TIPS:
|
Select a Single Value for a Multi-Value Pick/Name List
To select a single value for a MULTI_VALUE field that includes a pick or name list:
-
If nothing has been selected yet:
-
Double-click the field and scroll in the list to locate a needed value.
-
Double-click the value.
-
Press the Tab key (or Shift+Tab) to complete the selection and navigate to the next (or previous) field in the row and continue editing.
TIP: For long lists, if you know the starting letter of a needed value, type it to “jump” to that location in the list, then go to the next step.
-
-
If a value needs to be changed:
-
Double-click the field and clear the option box(es) for the selected item(s).
-
Click the field and press Enter. The list displays.
-
Double-click the needed value.
-
Press the Tab key (or Shift+Tab) to complete the edit and navigate to the next (or previous) field in the row and continue editing. Or use other keyboard shortcuts to navigate in the table or stop editing.
-
-
If a value is missing and you have the needed privilege, add it as follows:
-
Double-click in the field and review the list to ensure the value does not exist.
-
In the blank field, enter the new value and press Enter.
-
Click Yes in response to the confirmation message.
-
Press the Tab key (or Shift+Tab) to complete the edit and navigate to the next (or previous) field in the row and continue editing. Or use other keyboard shortcuts to navigate in the table or stop editing.
-
Select Multiple Values for a Multi-Value Pick/Name List
To select more than one values for a MULTI_VALUE field that includes a pick or name list:
-
Double-click the field.
-
Scroll in the list to locate the first value.
-
Double-click the value, then press Enter to bring up the list again.
-
Repeat steps 2–4 to select other needed values. All currently selected values will be listed.
-
If a value is missing, add it as follows:
-
Double-click in the field. It may or may not be blank.
-
Enter the new value and press Enter.
-
Click Yes in response to the confirmation message.
-
Repeat to add other missing values.
-
-
After all values have been selected, review the list of selected values.
-
To remove one or more values, clear the option box(es).
-
When the list is complete/correct, click in the field and press the Tab key (or Shift+Tab) to complete the edit and navigate to the next (or previous) field in the row and continue editing. Alternatively, use other keyboard shortcuts to navigate in the table or stop editing.
|
|
TIP: Clicking in the field and pressing Enter will toggle between the list of all values and the list of selected values. |
Work at the Case-Level in Case View
Work on Records in the Case View/Case Table
Version: 2023.8.12
Last Revision: 11/8/2023